How to choose camera optics for line-scan imaging of flat surfaces
Choosing a camera for a vision system is only half the job.
Without the right lens, even the fanciest sensor quickly turns into dead weight. And yet, lens selection often gets treated like a side quest. That’s a mistake that can cripple performance — or force an expensive redesign later.
In the previous post we talked about how to pick a camera for a vision system. Now it’s time to complete the setup with a proper lens. We also touched on which optical parameters are worth watching. Today we’ll go through each of them a bit more deeply and show how their values actually affect the image you get from the camera.
Before we dive into optics, let’s nail the basics. Your lens has to be physically and technically compatible with the camera in three key ways.
First: sensor size match.
The lens must be designed for at least the same sensor size as your camera. If not, the image circle won’t cover the whole sensor properly, which often shows up as dark corners or visible vignetting.
The rule is simple: if your camera has a 1” sensor, you can use a lens rated for a larger sensor (say 1.2”), but never the other way around. Picking a lens meant for a smaller sensor than you actually have is basically asking for trouble.
Second: the mount type.
Camera manufacturers use different lens mounts depending on the series and intended use. In industrial vision, the most common ones you’ll run into are C-mount and S-mount. This is purely mechanical compatibility — but it’s non-negotiable. If you choose the wrong mount, there’s no clever workaround. Check this spec before you order anything.
Third: resolution support.
Cameras with larger sensors often produce higher-resolution images, and some lens makers specify the maximum resolution their lenses are designed to handle. That matters, because a lens optimized for 2 MP won’t magically deliver the sharpness a 12 MP sensor expects. When resolution specs are available, pay attention to them — they effectively set the upper limit of detail your system can capture.
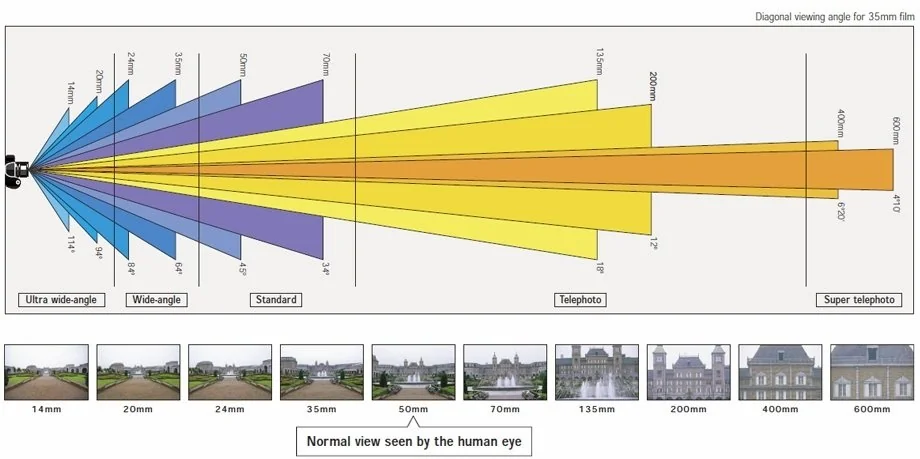
Now, focal length: distance and distortion. People often casually call focal length “zoom”, because it directly defines the working distance you need to fit the observed object into the camera’s field of view (FOV). Photo 1 shows this relationship perfectly: the shots were taken from the exact same position — only the lens focal length was changed.
In industrial quality inspection systems, focal length matters for two main reasons.
Working distance to the inspected product
This is the big one. On production lines, space is always tight. You rarely have the luxury of placing the camera far away from the product. On top of that, the required working distance often ends up defining the final size of the inspection machine. If your vision system has to fit inside a housing, a longer working distance usually means a bigger, more expensive build.
That’s why in these setups people often start with 12 mm and 16 mm lenses. With smaller products you can go longer, but keep the space trade-offs in mind.
Optical distortion
Sadly, going shorter has consequences. The shorter the focal length, the more optical distortion you tend to get in the final image. You start seeing that “fish-eye” effect. Yes, you can correct it in software using image undistortion, but that adds compute cost and it can be error-prone.
One important tip: some lens manufacturers provide distortion characteristics for their lenses. When you can get those numbers, they’re gold. You can judge upfront whether the distortion stays within your measurement tolerances, or whether you’ll need to correct it in your processing pipeline.
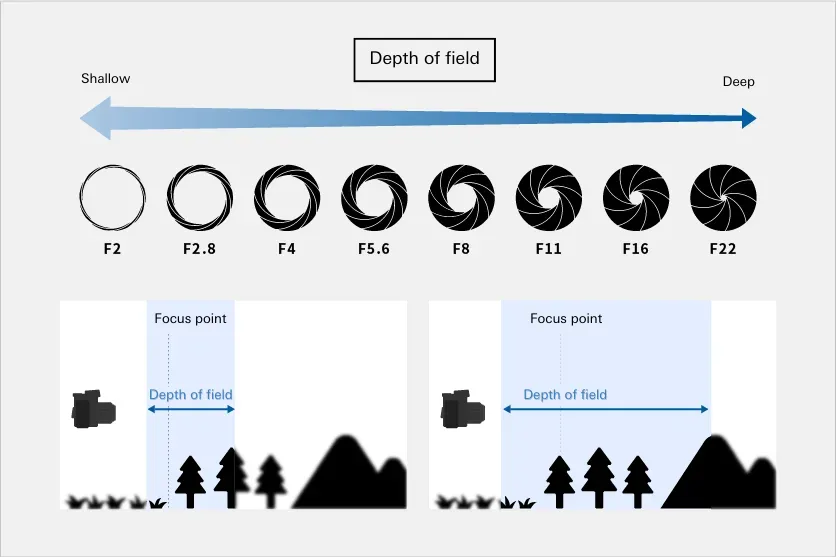
Aperture (F-stop): light, speed, and depth
Aperture settings control how much light passes through the lens and reaches the camera sensor. A more open aperture (lower F-number) lets in more light, while a closed aperture (higher F-number) limits it. Lenses with low F-numbers are often called “fast” because they let you expose the sensor more quickly, which supports faster image capture.
But aperture affects more than just brightness and exposure speed. It has a major impact on depth of field, meaning the range of distances in front of the camera that stays sharp instead of blurry.
Photo 2 shows it perfectly. A wide-open lens (low F-number) gives you the shallowest depth of field, while a more closed aperture (high F-number) gives you the deepest.
In the context of vision systems, this has real, sometimes critical consequences.
If your product is always positioned at a fixed, known distance from the lens, the decision is straightforward. Open the aperture as wide as possible, focus for that exact distance, and you’re done. A nice side effect of a wide-open aperture is faster exposure, which lets you keep exposure time short and often helps you push the camera to higher FPS.
Things get trickier when the product can sit at different distances from the lens. Now your system has a variable working range, and depth of field becomes a key part of whether the setup is reliable. To increase depth of field, you need to stop the lens down, which means less light reaches the sensor in the same amount of time.
You can compensate in two ways. Either increase exposure time, or boost the lighting intensity. There’s also a third option: lenses with programmable focus adjustment. The catch is that they tend to cost several times more than classic fixed-focus lenses, so in most industrial applications they’re hard to justify unless you truly have no other choice.
Practical implications: the real trade-offs
Let’s be honest, in industrial inspection every one of these parameters has a price tag attached, and as an engineer you’re constantly balancing trade-offs.
A short focal length helps you build a more compact system, but it also increases distortion and may push you toward correction in software.
A wide aperture gives you bright images and short exposures, but you lose depth of field and the system becomes sensitive to product position changes.
A closed aperture makes the setup more forgiving thanks to deeper focus, but it usually forces stronger lighting or slower capture speeds.
Summary
Choosing a lens is not about finding “the best” optics in general. It’s about finding the lens that solves your specific problem within your specific constraints. The parameters we covered, sensor compatibility, focal length, and aperture, are the foundation of that decision.
In practice, it’s common to prototype with a few lens options and test them in real production conditions with real product samples. Datasheets give you the boundaries. Hands-on testing shows which combination actually delivers the image quality and system robustness your application needs.